 By Brad Beer
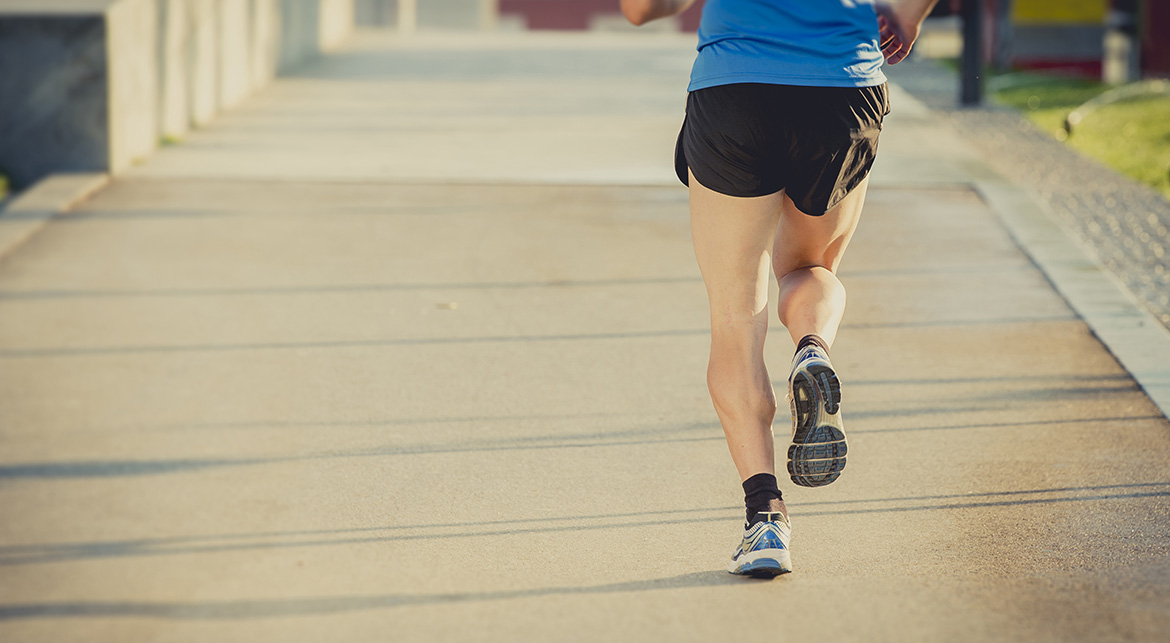
Achilles Tendinopathies
Achilles tendon injuries are one of the most common running injuries.
Common tendon injuries can include tendinopathies (insertional and mid-portion) and partial thickness tears. Other diagnosis can co-exist and can include: retrocalcaneal bursitis, Kager’s fat pad, and paratenonitis.
The two regions of achilles tendinopathy
When it comes to managing tendinopathies of the achilles tendon, there are two types: insertional, and midportion.
Insertional tendon pain occurs at the interface of where the achilles tendon inserts into the heel bone (calcaneus). This type of tendon condition is ‘technically’ an ‘enthesopathy’. An enthesopathy is where there is irritation of the tendon at the enthesis, which is the region where tendon fibres become contiguous with bone cells.
Mid-portion achilles tendon pain is experienced by runners in the ‘mid-portion’ of their achilles tendon. Tendon pain in this region can be one-sided (ie the inside or outside border of the tendon), or over the belly of the tendon itself.
Management of achilles tendon injuries
While management for midportion and insertional achilles tendinopathies is typically different, when it comes to the initial rehabilitation exercises required to commence rehabilitation, there can exist some overlap in the prescription of exercises.
For many runners suffering from either insertional or mid portion achilles tendinopathies, if they were equipped with the knowledge of the following key three exercises, it would allow them to make a sound start to rehabilitation. The sound start then provides the ‘launch pad’ for an effective and time sensitive rehabilitation program.
Beyond these exercises further targeted prescription of exercises will be generally required. These further exercises sit outside the scope of this blog post, which is aimed at giving runners the necessary tools to for achilles tendon rehabilitation.1transparentsct-top-padding
The three key stages of achilles tendinopathy exercises
The below outlines the 3 key stages that a runner must progress through in order to rehabilitate an achilles tendinopathy. Keep in mind that the key concept of tendinopathy treatment is to improve the energy storage capacity of the tendon. That is the ability for the tendon and associated muscle to do work and manage load.1transparentsct-no-padding
1. Isometric achilles tendon holds
Management of achilles tendinopathies and tendon pain in general has changed a lot in recent years. One significant change is the emergence of isometric tendon loading as a mainstay of tendinopathy treatment. Isometric tendon loading has been found to have pain relieving effects on tendons, while simultaneously maintaining some baseline strength. Click Here to learn more.
For this reason I often refer to isometric exercise as ‘medicine’ for sore and reactive achilles tendons. It is a paramount exercise to begin with for achilles tendinoapthies.
Depending on symptoms and tendon irritability these can be performed with either double legs or a single leg. For highly irritable (reactive) achilles tendons double leg holds, of often shorter duration, and less repetitions may be performed. The position of the isometric hold can either be mid or end of range (ie right up on the toes, or half way up).1transparentsct-btm-paddingInstructions:
- These are performed for 45 seconds and repeated 5 times.
- I suggest a 15-30 second recovery in between each repetition.
- Take 15-30 seconds between reps.
- This can then be repeated up to 3-4 times per day.
- In highly reactive tendons I may prescribe these isometric holds every hour.
1sct-bluesct-top-padding
2. Isotonic calf raises
These exercises can be commenced once a runner’s pain level and the tendon’s irritability has reduced. There are no ‘hard and fast’ rules for when to start a runner on isotonic loading for the rehabilitation of achilles tendinopathy. I tend to commence runners on graduated isotonic loading once they have approximately less than 5/10 pain (or tolerable and acceptable pain to the runner) on repeated single leg calf raises, their reported morning tendon stiffness has reduced.
The chief aim of isotonic exercise is to develop strength in the tendon and the associated muscle. In the case of the achilles tendon, this is the strength of the soleous and gastrocnemius muscles which join together to form the achilles tendon.
Recurring loading, such as when walking or running does not induce enough adaptation of the tendon matrix, nor the work capacity of the muscle tendon unit. Hence heavier loads are required with the commencement of isotonic loaded exercise.1sct-bluesct-no-paddingIsotonic calf raises should be performed at the mid-range of the muscle’s movement. The benefit of performing this exercise in the mid-range, is that it will avoid the compression of the tendon at end of range that can occur with exercising with heavier loads. For example at the very end range of ankle plantar flexion (toes pointed), or dorsiflexion (think letting the heel drop off the edge of a step) the achilles tendon is subject to compressive loads against the heel bone (calcaneum) which can be potentially irritating and pain producing.1sct-bluesct-no-paddingInstructions:
- While taking a ‘one size fits all’ approach to the prescribing of these exercises has its limitations, I generally prescribe 3x 8reps for all runners to begin with. Variations of this prescription of reps and sets can be prescribed for specific sports, activity, or individual requirements.
- Take 2mins recovery between sets.
- The repetitions should be performed slowly (3-6 seconds per repetition). Start with 3s repetitions and build to 6s repetitions.
- Typically these exercises will be performed 2-3 x week, or every second day.
- Completion of these exercises typically will require gym access. I often coach runners that while you can get so far being ‘creative’ with loading at home (eg dumbells, sand-bags, children!), getting into a stable Smith rack in a gym/strength and conditioning facility is the gold standard.
- Perform at mid range.
- Weight/load wise I suggest starting at 10-15% of your body weight. For example a 70kg runner would commence with 7-10kgs. Runners are often surprised at how challenging this is!
- To progress incrementally add weight each week eg 2-5kgs per week.
- The ultimate target for strength is to be able to complete 8 reps taking 6 seconds per rep, pushing 0.4-0.5 times body weight. For example for a 70kg runner, this would be 28-35kgs.
- Gradually increase the load with the repetitions while closely monitoring pain, in particular the pain and stiffness on getting out of bed the following morning. A sudden flare in symptoms may indicate that the weight used was too heavy. It’s important to increase the loads incrementally.
- The key here is that over a period of weeks and months the load needs to be heavy. Heavy slow resistance (HSR) exercise creates adaptation in the tendon matrix, crucial for effective tendon rehabilitation.
Note: These exercises can be done seated if the tendon is highly irritable. Seated isotonic calf raises can serve as a stepping stone to doing the exercise in standing.1sct-bluesct-top-padding
Seated calf isotonics
1transparentsct-no-paddinghttps://www.youtube.com/watch?v=rdaDqFGGwvY1sct-bluesct-no-paddingNote with isotonic calf raises be sure to avoid these common mistakes:
- Performing their repetitions too quickly. Each repetition will ideally be 3-6 seconds in length. The benefit of slowing the repetitions down is that the tendon is under tension for longer, increasing the likelihood of greater tendon adaptation to the exercise. Performing the raises off a step edge. The problem here can be compression of the tendon at end of range with the heavier loads. It is also very difficult to stabilise the body enough with the loads required for this exercise to induce the required tendon matrix change.
1sct-bluesct-btm-padding
- Don’t go heavy enough with the weight. Some runners are afraid of pushing the heavier loads, some runners cite a fear that they may ‘tear’ a calf while pushing heavier loads. I coach these concerned runners that they have a greater likelihood of suffering a calf strain if they do not lift the heavier resistance than by performing the exercise itself.
Remember that muscle strength changes will take time: typically 6-8 weeks, so don’t expect significant ‘overnight’ progress.
Remember that muscle strength changes will take time: typically 6-8 weeks, so don’t expect significant ‘overnight’ progress.1transparentsct-top-padding
3. Energy storage exercise
A crucial last stage of rehabilitation is the commencement and execution of what I term ‘energy storage’ tendon exercises. These exercises involve deformation of the tendon with jumping and hopping based exercises. These exercises assist the tendon to regain its capacity to absorb and then release energy via the stretch shorten cycle, that occurs when a runner lands and then pushes off at toe-off.
As a guide I will generally commence runners on these exercises when the runner is reporting minimal or markedly reduced morning stiffness in the achilles tendon on waking. In addition other criteria for commencing a runner on energy storage exercises include: when the runner has been progressing well with isotonic calf raise exercises, has very mild tenderness on palpation of the achilles tendon, and has been tolerating some running without a flare in tendon irritability and symptoms.
- For example increasing time under tension during heavy slow loading may increase strain on the tendon and result in greater adaptation, however increasing speed will be more likely to improve power and prepare for activities involving the Stretch Shortening Cycle
To begin with I will have runners complete the double leg hop protocol as outlined by Malliaris(1).1transparentsct-no-paddingInstructions:
- Aim to complete 3x week.
- Do the following_DL=double leg
- DL 3x 60 jumps
- DL 3 x 30 stiff knee
- DL fwd/bwds 10 x 3
- DL side/side 10 x3
1transparentsct-no-padding
- Build the 3 sets gradually (ie add 1 set per session) based on tolerance, or as a guide each week progress to include the next level. Eg week 1 DL 3x 60 jumps, then week 2 add DL 3×30 stiff knee jumps etc
- If you have a flare with your symptoms but you recover by the next session then continue same load. However if you have a flare in symptoms and are not recovered by the time of the next session regress to the previous level, or rest, and try again in 1-2 days.
- Shoes can be added in to achieve load tolerance (ie shoes will take load off the achilles tendon).
Runners can then progress to the single leg jump protocol, also designed by Malliaris.1sct-bluesct-padding
Beyond exercise for achilles tendinopathy
While it is extremely important to be doing the correct exercises for achilles tendon rehabilitation, exercise prescription is not the sole treatment for achilles tendon pain. Manual therapy for initial pain management is important, as are the appropriate addressing of contributing factors such as running training programming, and running footwear. Read more about how to address all running injury contributory factors in the 5 steps of my first book You CAN Run Pain Free.1sct-bluesct-top-paddinghttps://www.youtube.com/watch?v=eyFzIqhE3TI1sct-bluesct-top-paddinghttps://www.youtube.com/watch?v=5dnfU0dNqnM1transparentsct-no-paddinghttps://www.youtube.com/watch?v=R1_hBFnJkw81transparentsct-no-paddinghttps://www.youtube.com/watch?v=tB_2eCKxcjs1transparentsct-no-paddingInstructions:
- Aim to complete 3x week.
- Notes: build the 3 sets gradually (ie add 1 set per session) based on tolerance
- If you experience a flare but recover by next session then continue same load.
- If you experience a flare and are not recovered, regress or stop.
- Shoes can be added in to achieve load tolerance.
- Do the following_SL=single leg
1transparentsct-btm-padding
- SL 3 x 60 hops
- SL 3 x 30 stiff leg hops (note there will still need to be some bend in the knee, but just not as much as (a)
- SL 3 x 30 forward/backwards hops
- SL 3 x 10 side hops
- SL 3 x 5 zig zag hops
- Add speed when familiar with above program
- SL 3 x 10 hop on 20cm box + speed
- SL 3 x 10 hopping for height (ie bounds for maximal power-increases rate of force development)
1sct-bluesct-top-padding
For more advanced energy storage exercise runners can try:
1. Single leg step jump ups1sct-bluesct-top-paddinghttps://www.youtube.com/watch?v=ldlVqjdlpSo1sct-bluesct-btm-paddingInstructions:
- Have a step in front of you
- Standing on one leg hop up onto the step and back down maintaining balance
- Aim to keep light and quick on your feet
1sct-bluesct-no-padding2. The ‘hopskotch’ with an activation band.1sct-bluesct-top-paddinghttps://www.youtube.com/watch?v=bM8Sv9s0LKg1sct-bluesct-btm-paddingInstructions:
- Have a step in front of you
- Standing on one leg hop up onto the step and back down maintaining balance
- Aim to keep light and quick on your feet
1sct-yellowsct-padding
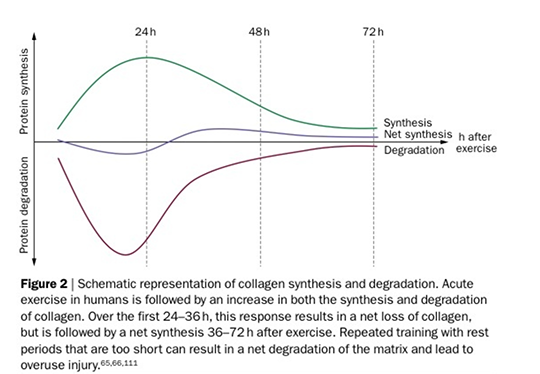
Reproduced from Magnusson et al. (2010)
Closing Thought: time for recovery
It should be noted that achilles tendinopathy rehabilitation whether for a reactive or degenerative tendon needs to be astutely managed. Tendon rehabilitation is far from ‘straightforward’. Tendon adaptation to the loads outlined above will take time.
Adequate recovery time needs to be allowed between rehabilitation exercise sessions to allow for the tendon matrix undergoing net protein (collagen-tendon building block) degradation in the 24-36 hours following the strength exercise session. See below.
If you are suffering from achilles tendon pain be sure to seek out the assistance of a sports physiotherapist to help you navigate the rehabilitation stages.
The above is a guide only, and does not take into account individual considerations.1transparentsct-top-padding
About Brad
0Brad Beer is a Gold Coast based physiotherapist who throughout his career has delivered in excess of 25,000 physiotherapy consultations. In 2006, Brad founded a physiotherapy group called POGO Physio which, since inception, has treated over 16,000 people.
Recognised as a leading authority on running injury prevention and rehabilitation, Brad himself is an avid runner and is passionate about seeing people unlock their true running potential.
Brad believes that all runners can and should experience pain and injury free running. In 2015 Brad released his first book You CAN Run Pain Free! A Physio’s 5 Steps to Enjoying Injury Free and Faster Running to educate runners that it is indeed possible to enjoy the many benefits of pain free running. Brad’s clients include age group, novice, beginner, and elite athletes. Brad has assisted his clients in winning multiple Australian, world, and even Olympic medals.
Follow Brad’s running advice online:
Wesite | bradbeer.com.au
Facebook | running.physio
Twitter | @Brad_Beer
Instagram | @Brad_Beer

 Brad Beer is a Gold Coast based physiotherapist who throughout his career has delivered in excess of 25,000 physiotherapy consultations. In 2006, Brad founded a physiotherapy group called